Want to reduce energy costs and the risk of possible data loss?
A dynamic increase of data volumes leads to greater the hardware requirements and greater power consumption – forces us to search for new solutions that can reduce the costs associated with this. So, every new chance to significantly reduce energy costs because of hardware power usage and cooling requirements is more than welcome in most organizations. The same goes for every additional possibility of enhancing the existing, or implementing new, disaster recovery solutions and decreasing the risk of possible data loss. One of the opportunities for an easier and more cost-effective data management is the solution of boot an operating systems from a remote iSCSI disks — and that is why we decided to test it for you.
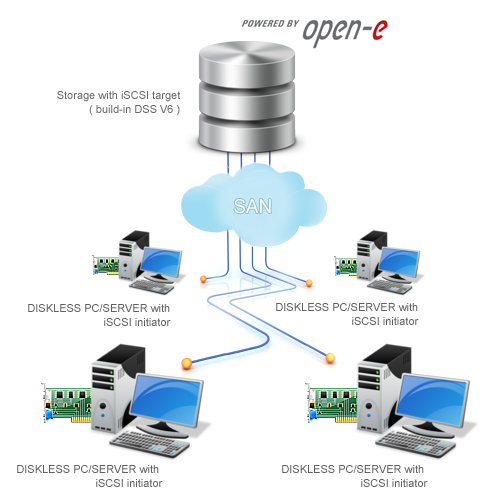
The iSCSI protocol can send SCSI commands over IP networks between clients (initiators) and SCSI storage devices (targets) – and thanks to that it allow for eliminating the need for a local hard drive. This configuration along with the Automatic iSCSI Failover allow to enjoy high availability of resources and even better prevention against data loss – the worst admins nightmare. This automatically presents you with the opportunity to easily make reliable backups and to improve redundancy and dynamic resources allocation.
Learn how to boot an operating system from highly available iSCSI LUN with Open-E DSS V6 via SAN.
We have checked it in our Lab and now we want to share with you instructions on how to carry out a successful configuration of this process.
So what you will need?
1.Two Open-E DSS V6 licenses (or just one if you choose an option without an Automatic iSCSI Failover)
2.Host Bus Adapter (HBA) for every diskless PC or server as an iSCSI inicjator
3.SANsurfer tool (installed on the operating system).
Our task was to boot an operating system from a remote iSCSI disk. For this purpose we used Open-E Data Storage Software V6, which provides iSCSI target functionality, and an iSCSI initiator, Qlogic HBA QLA 4050C (hardware). Integration with existing Ethernet networks does not require any special, expensive equipment or cables. Because Open-E DSS V6 has an iSCSI failover clustering feature – our iSCSI disk (called LUN – Logical Unit Number) would be perfect for this job. But if you need a low-cost solution, a LUN can be provided without failover functionality. In such an option you will need only one Open-E DSS V6 system.
Configuration in a few easy steps:
STEP 1
The first thing to do is to configure the iSCSi failover. The whole configuration of this process is described in detail here.
STEP 2
After that the iSCSI hardware initiator will have to be configured. To access all firmware settings, not only those which are available directly from controller bios, an iSCSI Qlogic SANsurfer tool will be needed (you can download it from Qlogic website here).
STEP 3
Unfortunately firmware settings can not be modified under an active connection between initiator and target, therefore an auxiliary computer system with SANsurfer installed will be needed (with a Qlogic HBA controller installed. In a prepared environment we ran an SANsurfer and enabled two firmware options: gratuitous ARP and ARP redirect. But why is this so important? Both Open-E DSS V6 iSCSI failover nodes – primary active and secondary passive, have network interfaces with unique MAC addresses and virtual IP’s assigned.
For example:
Node 1 /primary /active/ eth0 MAC : 00:0A:E6:3E:FD:E1 virtual IP:10.10.10.1
Node 2 /secondary /passive/ eth0 MAC : 00:0B:D4:3A:3D:0B
virtual IP:10.10.10.1
Let’s say that an iSCSI hardware initiator is connected to target on Node 1 (primary active, virtual IP:10.10.10.1, MAC : 00:0A:E6:3E:FD:E1 ) and at some point the power fails. Node 1 becomes unavailable so failover occurs. That means that the connection to target was switched to Node 2 with the same virtual IP but with a different MAC address. So to reconnect an iSCSI hardware initiator we have to be able to refresh the MAC address. Therefore, the mentioned firmware option has to be enabled.
STEP 4
Now it is time to connect to the Open-E DSS V6 target. It can be made now on an auxiliary system using the SANsurfer tool or later directly from controller bios. We will describe how to configure the hardware initiator controller bios to boot from the target’s LUN.
The first thing to do is to set the host adapter network:
Menu: configuration settings -> host adapter settings
Secondly, enter target IP and SCSI name.
In this case the target IP is the Open-E DSS V6 virtual IP and the SCSI name is the DSS target name:
Menu: configuration settings -> host adapter settings -> iSCSI boot settings -> primary boot device settings.
If controller network settings are configured correctly and the target is not password protected: (chap user / chap secret) function (menu: scan iSCSI devices) displays all LUN information.
STEP 5
The last thing to do is to set the LUN as the boot device in motherboard bios.
And that’s all. It’s simple, isn’t it? We are curious to hear about your experiences with booting from Open-E DSS V6 iSCSI Failover, so we would like to invite you to take part in the interesting discussions on our storage community forum.


2 Comments
Kaloian Parchev /
20, 10 2011 11:34:39Very good article!!
Ryszard Stawiarski /
20, 05 2012 01:58:39@salmon
iPXE is not an famous and much supported, I’ve already tried to use it… and experienced many problems with that stuff 😛
You can use it but in some cases it can by veeeery nasty 🙂