This page relates to our legacy software, which is no longer supported. Explore the advantages of Open-E JovianDSS.
To connect to an iSCSI Target Volume over a LAN from a Microsoft Windows system, perform the following steps:
- Hardware configuration
- Configure the DSS V6:
- Configure iSCSI Target Properties
- Initialize the disk from iSCSI target
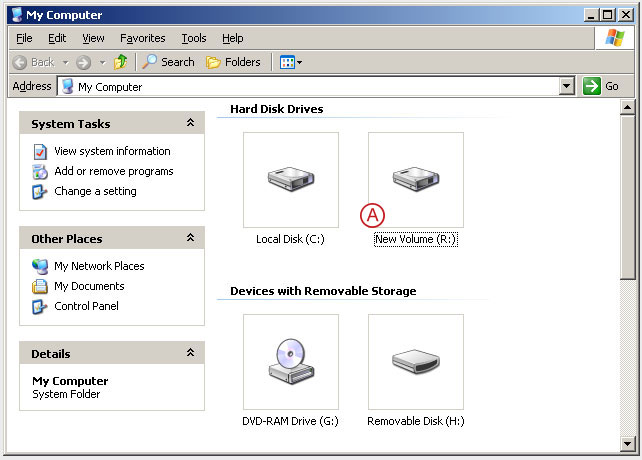
- Accessing to the disk
NOTE:
You must be using DSS V6 up13 or newer.
top ↑1. Hardware configuration
Hardware Requirements:
To configure an iSCSI Target Volume in MS Windows, a iSCSi Initiator in the MS system is required and one Open-E Data Storage Software V6 server with an iSCSI target. In this example the DSS V6 system and Windows 2003 with iSCSI Initiator v. 2.08 will be used.

Pic 1

Pic 2
Under the "CONFIGURATION" tab, select  "volume manager" and next Vol. Groups.
Volume Groups (vg00)
In Unit manager add the selected physical units ( Unit MD0 or other) to create a new volume group (in this case,
  vg00) and click apply button.

Pic 3
Select the appropriate volume group (vg00) from the list on the left. In Action select a new iSCSI volume of the required size. This logical volume will be the iSCSI Target .
Select the appropriate volume Next, select the required size of iSCSI volume. In this eg. Adding 200 GB for the iSCSI volume.
After assigning an appropriate amount of space for the iSCSI volume, click the  apply button.

Pic 4
- The destination iSCSI Volume Block I/O is now configured.
iSCSI volume (lv0000)

Pic 5
Choose "CONFIGURATION", "iSCSI target manager" and "Targets" from the menu.
- In the Create new target, click the apply to confirm
iSCSI targets

Pic 6
Select target0 within the Targets field.
iSCSI targets
To assign a volume to the target, click the  button located under Action.

Pic 7
- The destination iSCSI target is now configured.
iSCSI targets (target0)

Pic 8
- In the MS Windows Environments run "iSCSI Initiator Properties". After running the program click on the "Discovery" tab.

Pic 9
Next, click on "Add" button. In "Add Target Portal" windows then enter the IP address of the DSS V6 server and click on the "OK" button.
NOTE:
The port number of 3260 will already be there as this is the default iSCSI port number.

Pic 10
Go to the "Targets" tab and click "Refresh". You should see the name of your iSCSI Target in the list. Select your target server and click "Log On".

Pic 11
In "Log On to Target" windows please check to "Automatically restore this connection when the system boots" and click "OK".

Pic 12
You should now see that you are "Connected". Click "OK" and close out the iSCSI Initiator Properties.

Pic 13
Now click on "Administrative Tools", open "Computer Management", and click on "Storage" -> "Disk Management". You will have to initialize the disk if it hasn't been used before.

Pic 14
After connecting to Logical Disk Manager in "Disk Management" there will appear "Initialize and Convert Disk Wizard". In this example, before you connect to the basic disk, please click "Cancel" button.

Pic 15
Right click on the disk 5 and click on "New Partition".
NOTE:
In this example Windows OS has assigned the Disk number 5. Please note, in other system this number can differ!

Pic 16
In "New partition Wizard" click "Next" button.

Pic 17
Please select "Primary partition" and click the "Next" button.

Pic 18
In order to use the maximum disk space on the disk click the "Next" button.

Pic 19
- Next assign the drive letter (in this example as R), and click the "Next" button.

Pic 20
In the MS Windows New Partition Wizard select the format of choice, in this example we will use the NTFS File system then check the Perform a quick format and click "Next" to complete the format.

Pic 21
- When you are done, your disk manager should look like this: